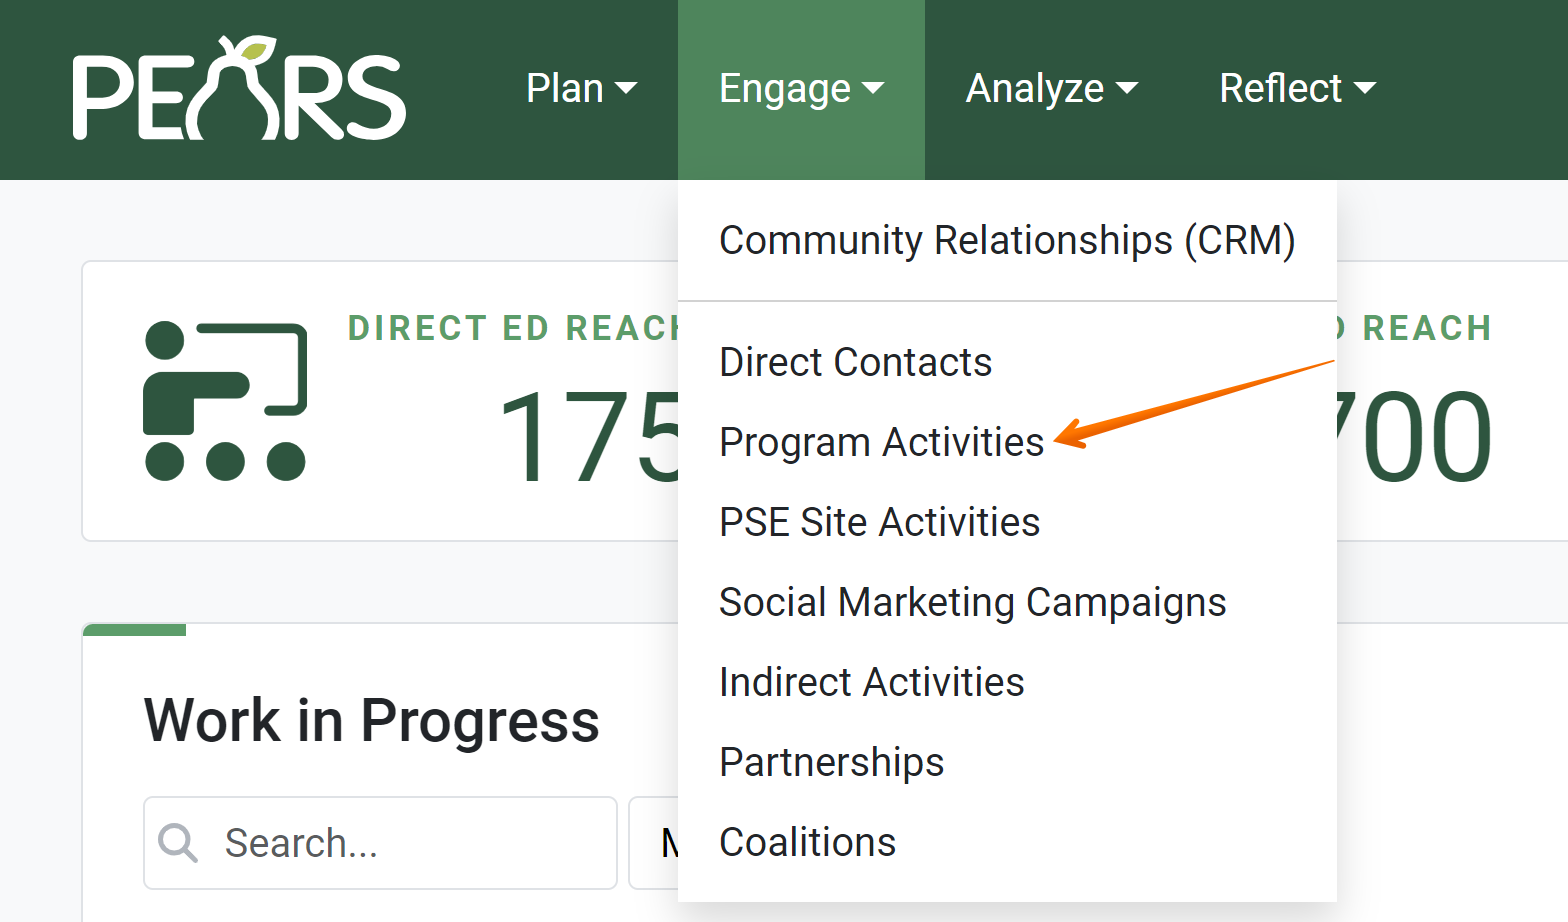
- From the PEARS homepage, hover over the Engage menu and click Program Activities:

- The Program Activity list displays. Click Add:

The General Information page displays.

- First, choose a name for the Program Activity. Each organization may suggest naming conventions.

- If applicable, in the Program Areas field, select the program areas associated with the Program Activity. Select multiple program areas or a single program area.

- Optionally, select a program group. Options listed change, based on the program area(s) selected.

- In the Action Plans field, select the Action Plans associated with the Program Activity. Select multiple action plans or a single action plan. The option “Not linked to an Action Plan” is also available, if needed.

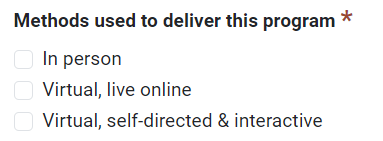
- Next, select the Method used to deliver this program.

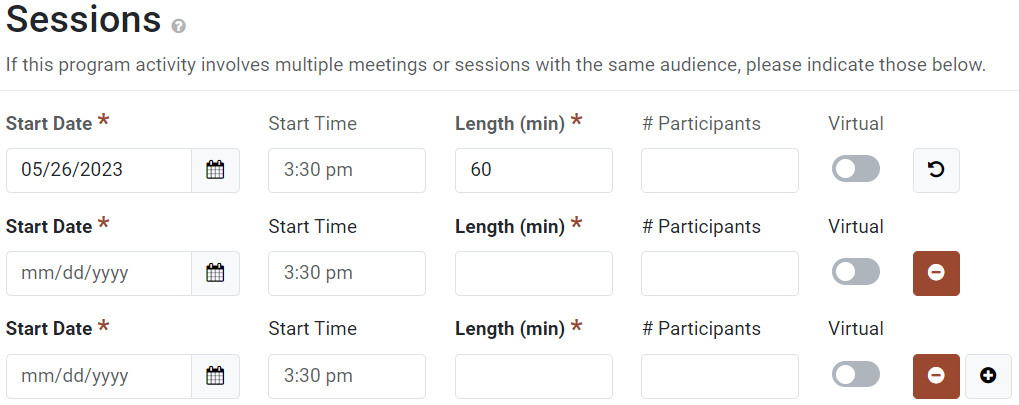
- In the Sessions section, record information related to each session, including: Start Date, Start Time, Session Length, # Participants. Also, click the toggle to indicate if you used a Virtual meeting platform. If Virtual is selected, the toggle will turn green. If needed, click the plus icon to add sessions. Click the minus icon to remove sessions. An Undo button becomes available if you remove a session.

- Select the Delivery Site where the program is located. After searching for a site, if the site is not shown in the list, click Add Site to enter the site information manually.

- From the drop-down list, select the Unit where the Program Activity was delivered.

- Next, select Language(s) used to deliver this program.

- If applicable, answer the question, Did this program activity deliver any programming to youth?

- In the Volunteers field, record the number of volunteers involved and the total hours worked by all volunteers.

- Optionally, in the Comments field, add any helpful information not captured in the previous fields.

- In the File Attachments field, upload related files as needed.
To upload files, click Select to choose files from the computer’s file explorer. Alternatively, drag and drop files into the gray area.
You may upload many different types of files, including: Word documents, PDFs, Excel workbooks, jpg, png, and others.
- Click Save and Continue to save the page and move to the next section or click Save to save progress and view the record details.

✓ TIP:
The red asterisk * next to the heading of a field indicates that the field is required. You will not be able to save until you have added input into that field.
GLOSSARY:
A program group describes a target audience or specific subject.
NOTE:
The Program Group field is currently only available within Kansas State University and will not appear for all users.
✓ TIP:
The Action plans field will only display for Extension organizations.
GLOSSARY:
In person refers to programming that is delivered by instructors to participants in the same physical space at the same time. Virtual, live online refers to programming that is delivered by instructors to participants through a virtual space at the same time. Virtual, self-directed & interactive refers to programming that is provided for participants to engage with content at their own pace.
✓ TIP:
Record multiple sessions if you deliver a series of lessons to the same audience (ex. the same elementary school class.)
Record a new Program Activity for each unique audience (ex. different elementary school classes.)
Record a new Program Activity for each unique audience (ex. different elementary school classes.)
✓ TIP:
Once you click the minus icon the session won't disappear immediately. Instead, the deleted session is disabled from editing. The undo button, that appears when you delete a session, allows you to reverse the deletion. Once you save, all blank and deleted sessions will disappear.
✓ TIP:
You can search for sites by the site name, with any part of the address (street name, zip code, etc.), or by the PEARS ID number associated with the site.
✓ TIP:
Delivery Site will be a required field if you select In Person in Step 7. In any other case it will remain optional.
✓ TIP:
The "youth programming" question shows depending on your organization's program area settings:
Extension: This question is customizable to each program area by the organization. To edit this setting, you must edit the program area list in Manage Lists under the gear icon.
SNAP-Ed Only: This question will not show in program activity records or in manage lists under program areas.
Extension: This question is customizable to each program area by the organization. To edit this setting, you must edit the program area list in Manage Lists under the gear icon.
SNAP-Ed Only: This question will not show in program activity records or in manage lists under program areas.
EXAMPLE:
If 5 volunteers worked for 2 hours each at 3 sessions, record 30 total hours.
Total hours =
(# volunteers x # sessions x # hours per session)
Total hours =
(# volunteers x # sessions x # hours per session)
EXAMPLE:
You may want to upload a recipe file, attendance sheet, worksheet, or picture from the program.